
0
Owner's of the Canon Indoor Furnishings RS-CL10 gave it a score of 0 out of 5. Here's how the scores stacked up:


9
6
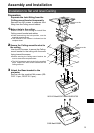
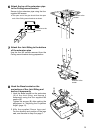
Attach the top of the extension pipe
to the Ceiling-mount bracket
Securetotheextensionpipeusingthefour
suppliedM5screws.
●Theopenendofthepipeshouldfacetheopen
endoftheCeiling-mountbracketasshown.
7
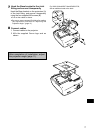
Attach the Joint tting to the bottom
of the extension pipe
UsethefourM5screwsremovedfromthe
Ceiling-mountbracketduringpreparation.
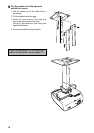
8
Hook the Base bracket on the
projections of the Joint fitting and
secure it temporarily
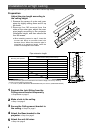
1 HooktheBasebracketontheprotrusion
(A)oftheJointfitting,andsecureit
temporarilyusingthefoursuppliedM5
screws(B).
Tightenthescrews(B)aftermakingthe
adjustmentin"AdjustingtheProjection
Angle"(page11).
2 Affix the suppliedCanon logoseal.
Forthe
directionandpositionofthelogo
seal,seetherefertostep8onpage7.
Directiontothe
screen
Directiontothe
screen
Directiontothe
screen
B
A
B


Find Your Products By Category
- Home Audio
- Portable Media
- Computer Equipment
- Musical Instruments & Equipment
- Power Tools
- Video Game
- Car Audio and Video
- Baby
- Lawn and Garden
- Communications
- TV and Video
- Household Appliance
- Kitchen Appliance
- Personal Care
- Photography
- Marine Equipment
- Laundry Appliance
- Fitness & Sports
- Automotive
- Cell Phone
Please Login
